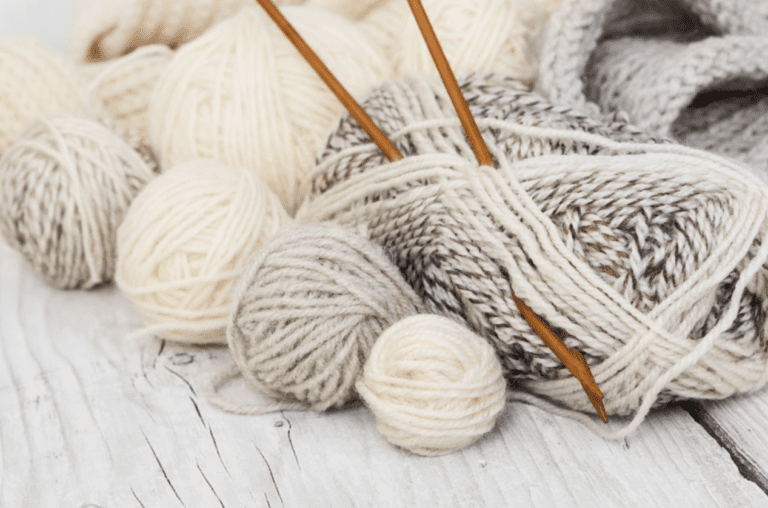
How to Knit with Beads
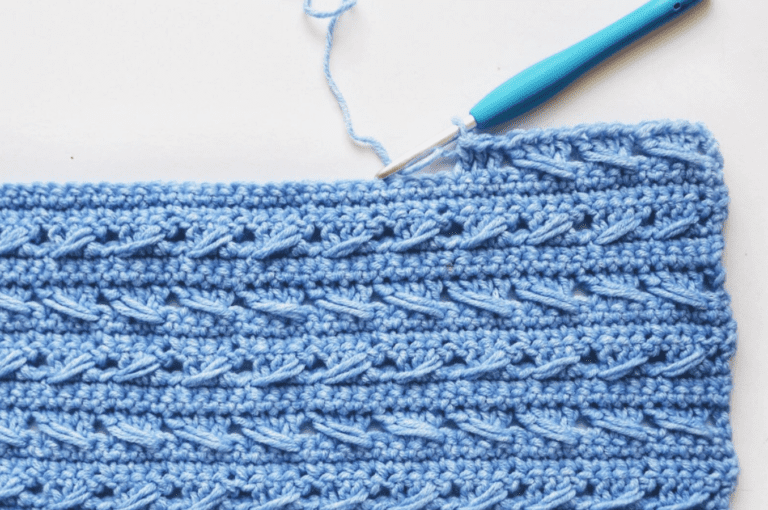
Once you’ve mastered basic stitches, how can you level up your knitting? There are many ways—modern techniques such as entrelac knitting come to mind—but one of the most charming ways is to start adding beads as you knit. A row of pearls spread along a neckline can take a sweater from beautiful to unforgettable. An easy way to crochet with beads is to do it with a crochet hook as shown here.
- What will you need?
- Equipment / Tools
- 1mm crochet hook or thin dental floss
- Knitting needles
- Beading pattern or graph paper
- Content
- yarn
- A garland of beads
- Instructions
- Gather your bedding materials.
If there’s such a thing as “the best of both worlds,” I’d have to say it’s beading and knitting at the same time. I’m obsessed with all kinds of yarn and almost anything that sparkles, and while I still do knitting and beading as separate endeavors, I now spend a lot of time doing beadwork on my knitting needles.
I use five different techniques to incorporate beads into my knitting. The first two techniques are traditional, dating back to at least the mid-nineteenth and early twentieth centuries, respectively, and the last three are recent developments. All but the last technique requires beading on your yarn.
Beadwork is a technique used for graphic design. It was popular with Victorian-era knitters and was used in children’s bonnets, gloves, socks, handbags and other small items. While you can use the technique for single color and random designs, for graphic designs you will have to present the beads according to the chart. The beadwork is done on a stockinette stitch background, and each bead is worked in one stitch.
With beadwork, a bead (or beads) is strung on the thread between two stitches. With this technique, you can actually add more beads to shape your woven piece. This is the method used in many pearl necklaces of the 1920s. The beads are usually all the same color, so it’s much easier to make a presentation than to knit a bead with a chart. The back of the work shows the beads lying between two woven stitches. The pearls lying between the two pearl stitches are shown on the front of the work. Shaped pieces, such as beaded purses, are done in a garter stitch, and beads are added to either side of the fabric. You change the shape by leaving more or fewer beads between the stitches.
Slip stitch bead knitting floats a bead over a slipped stitch and you can use this technique to add a bead over a knit or purl stitch. The beads can be placed randomly or in a pattern, and since the bead is on top of the fabric, it won’t affect your gauge. When you get to the spot where you want the bead, you bring the yarn to the front, slide one bead closer to the needle, slip the stitch, and work the next stitch. You can place the bead on the front when working right or wrong side rows.
Another option is to weave a carry-on bead. With this method, you thread the beads onto a separate thread that you carry along with your main thread. This gives you the possibility to knit with beads that are too small to thread on your knitting yarn. You can also use larger beads with this method. Because the beads are on a separate thread, they won’t affect your gauge.
Finally, with hook bead knitting you can add beads to individual stitches with a crochet hook. With this method, no pre stringing is necessary. When you get to where you want the bead, you place the bead on a small crochet hook, take the stitch off the knitting needle, pull it through the bead, and then pull the stitch onto the knitting needle. They change. This can save breakage on delicate yarn.
Depending on your knitting project, you will need different types of equipment to properly thread your beads. If you are using a bead pattern, use yarn and beads specific to your project. Choose a bead shape by understanding the texture and width of your yarn. Make sure your beads and thread are the right fit, keeping in mind that larger beads don’t work well with thin yarn while smaller beads often don’t work with heavier yarn. Before starting your project, test the bead thread on the yarn to make sure it will work.
If you’re making your own bead pattern, sketch it out on graph paper first to see the threading and crocheting placement. Usually, the pattern will include instructions on which beads to thread. Without a pattern, plan ahead of time to make sure your design looks flawless.
This year’s mystery shawl, Trick of the Light MKAL, features some (optional) beaded sections. A question I get asked a lot is how to add beads to a weave. It’s not difficult but requires nimble fingers and a bit of patience.
Beaded weaving
Beading is one of the easiest ways to add a little glamor to your knitting, so we asked Debbie Tomkies to show us how it’s done.
Beads can be added by threading them onto the yarn, integrating them into the fabric as you knit, using a thread carried along the main yarn, or by sewing them in later. Which one you use will depend on the size of the bead, the type of yarn, how many times the pattern will be beaded, and how much patience you have!
Prestringing is where the beads are strung onto the yarn before weaving begins, and is the method we generally recommend. This is a quick and easy process when working with one color and bead type. However, if you are working with several colors, this requires careful planning in advance because the order in which the beads are threaded is critical to success.
Often a chart is provided showing where to place your beads, not a color work, cable, or lace chart – in fact, this can be incorporated into the chart with other techniques, such You will notice that when you knit the Glacier Hat pattern from issue. 16 to be now.
Threading the beads onto your yarn (pre-stringing)
Using a regular sewing thread and a beading needle, pass the thread through the needle twice, leaving a loop of thread for the yarn. Pass the yarn through the loop in the thread then place the beads on the beading needle, sliding them over the sewing thread and then over the yarn.
Now you can make it with your beads. There are many ways to knit with prestrung beads, but these are two of my favorites:
Stitched Stitch Method – The bead sits horizontally in front of the stitch.
1. When your pattern tells you to put on a bead, slide it up with the yarn, bring the working thread forward (as if to purl), then slip the next stitch in the direction of the purl.
2. Place the bead in front of the work, and place it on the fabric and the RH needle. If the next stitch is knitted, take the yarn to the back of the work and knit as usual. For the purl stitch, leave the thread on the next section and purl as usual. The bead is now firmly in place and should sit vertically on the thread floating above the slip stitch. The bead sits on a strand of thread that floats across the front of the work. The bead is prominent and clearly visible from the front, and not visible from the back.
Between Threads – The bead sits vertically between two stitches.
1. When your pattern tells you to insert a bead, slide it up with the yarn, keeping it close to the RH needle, then work the next stitch as normal, pulling the bead with the LH finger if necessary. Push forward.
2. The bead sits securely on the thread between the stitch that just worked and the previous stitch.
Using this method, the beading may not be as prominent as with the slip stitch method but it can be useful for fine reversible fabrics where it may be necessary to see some of the beadings on the reverse.
Beads 101 – What Every Knitter Needs to Know About Beads
Knitters who visit bead stores for the first time may be overwhelmed by the abundance of bead types, colors, and sizes. Here’s a quick guide for the uninitiated.
Beads come in different sizes that will fit on different weight yarns. Seed beads, which are the most commonly used beads for weaving, are measured in numbers such as 3, 6, 8, or 10. The higher the number, the smaller the bead. The number refers to how many beads fit in a certain measured length.
Pearls are also classified by size in millimeters. 6/0 seed beads are about 4 millimeters (mm) in diameter as the beads. But there is one important difference – the size of the hole. Seed beads have a larger opening, which makes them better for making. 4 mm beads, which can be made of glass, ceramic, semi-precious stones, or even plastic, usually have a small hole.
So get your beads wherever you can — I love looking for them in odd places! But before you plan to use them for a knitting project, make sure the hole is the right size by putting some thread on your yarn. Getting your beads home and finding that they won’t go onto your yarn without a struggle can be a real hassle.
When you walk into a bead store, you’ll notice that beads come in all kinds and sizes of containers, which vary from store to store. Some shops sell beads in sealed packets or bags, some in vials that look like pill bottles, and some are strung on strings and hung together in a hank.
To give you an idea of how many beads you’re buying by weight, that’s about 13,440 6/0 seed beads per kilogram (2.2 pounds for you non-metric folks) or 270 per 20 grams. Beads on hanks are usually sold by the count, ie 50, 100, or 1000 beads. So, if you’re making a beaded shawl that requires 1,500 6/0 beads, for example, you’ll need to buy about 120 grams of beads or about 4-1/3 ounces.
I’m giving you very rough estimates here, which brings me to an important point. Always buy more beads than you think you will need. Seed beads, at least those commonly found in Czechoslovakia, have some irregularities and you can expect a few duds in each package. If you can find seed beads from Japan, they will be close to perfect, but also usually more expensive. Hey…like with other things in pearls, you get what you pay for.
How do you weave beads into yarn?

This is where the fun begins. There are two main methods, each with many variations. Basically, the beads are either strung onto your yarn before you start knitting or strung onto the stitches with a crochet hook as you go. There are many variations to either method, and canters can be opinionated as to which is the “correct” method. My feeling is that any way you can imagine the beads going in, around, or on the yarn is a good way to try. Let’s face it, we’re still in the experimental stages of learning what’s possible with beads and yarn. Beading is still in its infancy, and it’s entirely possible to imagine ways to bead that no one has ever thought of before!
That said, here are some basic techniques that have worked well for me and many other knitters.
Slip the pre-stitched beads into place as you weave
The most common way to weave beads into fabric is to thread them onto your yarn and begin sliding them into place as you weave.
I like to use dental floss threads for stringing because they are cheap and easily found at drug stores. Dental floss threaders are what people use to thread floss around their braces and bridges. It is semi-rigid plastic and is made up of an open loop and “jointed” section, and serves as a needle with a large eye.
To use it for threading beads onto yarn, pass the knitting yarn through the loop of the threader and pick up the beads with the working end of the “needle”. Then slide the beads over the loop and onto the yarn.
Here’s an easy way to knit with pre-stringed beads:
1) Knit on the right side of the work, on the stitch where you are going to attach the bead.
2) Bring your yarn to the front and slip the next stitch across.
3) Slip a bead as close to the right hand needle as possible.
4) Bring your yarn to the back and continue knitting leaving the manka in front of the sewn stitch.
This results in beads that float in front of the slipped stitch on the right side of the woven fabric.
My example uses knit stitches, but you can just as easily clean
An easy way to add beads to a knitting project
An easy way to add beads to a knitting project as you go
Adding beads to a project has two advantages. The most obvious thing is that beads on woven fabric look very beautiful, like dew drops on a spider’s web. We can also use them to create geometric designs as we see on the beautiful Lithuanian beaded wrist warmers.
Another advantage of knitting with beads is that the beads make the project heavier. The added weight improves the drape of the fabric significantly. That’s why beads are often added to the bottom edges of scarves and shawls or at strategic points in lace stitch patterns to open up the yarnovers and make the pattern look better.
There are many ways to add beads to a knitting project. The most common method is to pre-string all the beads you plan to use in the project onto the working yarn and slide a bead down the yarn each time you want to add a bead to the fabric.
There are some drawbacks to this method – if we work on a large project like a shawl, we may need to pre-string a thousand beads before stitching. Also, if you need to add another ball of yarn or if the ball of yarn you are using has a knot, you will need to re-string all the remaining beads.
A more knitter-friendly method is to add beads to the stitches one at a time whenever we want to see a bead in our project. In this tutorial, I will show you how we can do this. Before we get into the step-by-step instructions, let’s talk about the materials needed for the beadwork.
Knitting is one of my favorite activities. It’s fun, it’s relaxing, and it has a great meditative quality that helps relieve stress. Fiber arts and knitted accessories make the outfit more fun. (What’s better than having someone complete your scarf and be able to say ‘Oh, I made that.’) Try incorporating seed beads into your next project, it’s easier than it looks.
and it adds a special touch to your creations. Adding a few pearls or a pearl pattern to your weave adds beauty and interest. You are able to add texture or shine depending on the colors or finishes you choose. Colorful thread pigments mixed with beautiful Miyuki seed beads turn any ordinary fiber art into a real showstopper! If you’re a beginner, adding beads to the ends of a scarf is an easy way to get started. If you’re a more experienced knitter, sprinkling beads in intricate cob shawl patterns or at the end of each pointed edge will add weight (and look like a million bucks!) to this feathery stitch.
Walking into a bead shop for the first time, the variety of bead materials, colors, and sizes can be overwhelming. Which ones are best for knitting? Which ones will fit into my yarn choices, and how are the beads applied to the woven fabric? And finally, how are they properly placed so they won’t move around? In this article, we will answer all the above questions – but first, let’s talk about terminology. Beaded weaving. Or is it called becoming a garland?
Beading or beading?
Knitting with beads is an old and traditional art that you can do in two different ways: using them as a feature, or using the beads as decoration. This article points to the latter.
The first and oldest method, first developed in the Victorian era, is used for brooches and other elaborately decorated items. This craft is called “bed knitting” (sometimes known as purse knitting). Beads are worked by threading them onto working yarn or thin wire, beadwork is worked by placing a bead between each stitch. The stitches made in this way are completely hidden by the beads.
Beaded weaving
When we’re talking about beading on knit fabric, we’re actually referring to something else: beaded knitting. This method beads at planned or random intervals. Beads are added by threading directly onto the working yarn before you begin, or by attaching as you go.
When using beads threaded onto the thread before starting, they usually fall on the stitches instead of between them. A crochet hook is used to hold the beads as you knit, and there is no need to thread any beads before you begin knitting.
When worked in this way, the bead is placed directly over the stitch and secured by self-weaving. No additional steps are necessary to preserve the beads.
You can be creative when you add beads to sewing patterns. Add beads to pattern indentations, to the sides or centers of cables, or to holes made by eyelet stitches.
You can find a collection of beaded shawl patterns along with an extensive introduction to beading in my book Beaded Shawls.
Choosing beads for weaving
The size of the beads
Beads come in different sizes, with different yarn weights. The most commonly used seed beads are seed beads. Seed beads have larger holes than most other beads, making them a good choice for bead weaving. The most popular manufacturers for seed beads are Toho and Miyuki.
The size of the seed beads is listed in specific numbers (eg 11/0) indicating how many of them fit into a certain length. The higher the number, the smaller the beads.
Toho and Miyuki use the following sizing table:
- 11/0 (Size: 2.2mm; Hole Size: 0.9mm)
- 8/0 (Size: 3 mm; Hole Size: 1.4 – 1.5 mm)
- 6/0 (Size: 3.5mm; Hole Size: 1.7mm)
- 3/0 (Size: 5.5mm; Hole Size: 2mm)
- Ordinary beads, which can be made of various materials such as glass, ceramic or even plastic, usually have a small hole. Before you decide to use the beads of your choice for a knitting project, thread a few of them onto your thread to make sure the hole is the right size.
Mix your pearls with yarn, using luxurious pearls on silk and other shiny threads for evening wear, and rough pearls on tweed and wool for day wear.
Delicate threads should be beaded with care. Some are not strong enough to withstand the action of beads without fraying or wearing.
Using pre-string beads
Work the bead stitch, then slide the bead to the back of the work. Insert the needle as if to knit; Wrap the yarn around it. Push the bead forward through the stitch on the left needle. Complete the stitching. Stitch firmly on both sides of the beads to keep them in place and prevent them from falling to the back of the work.
Using a crochet hook
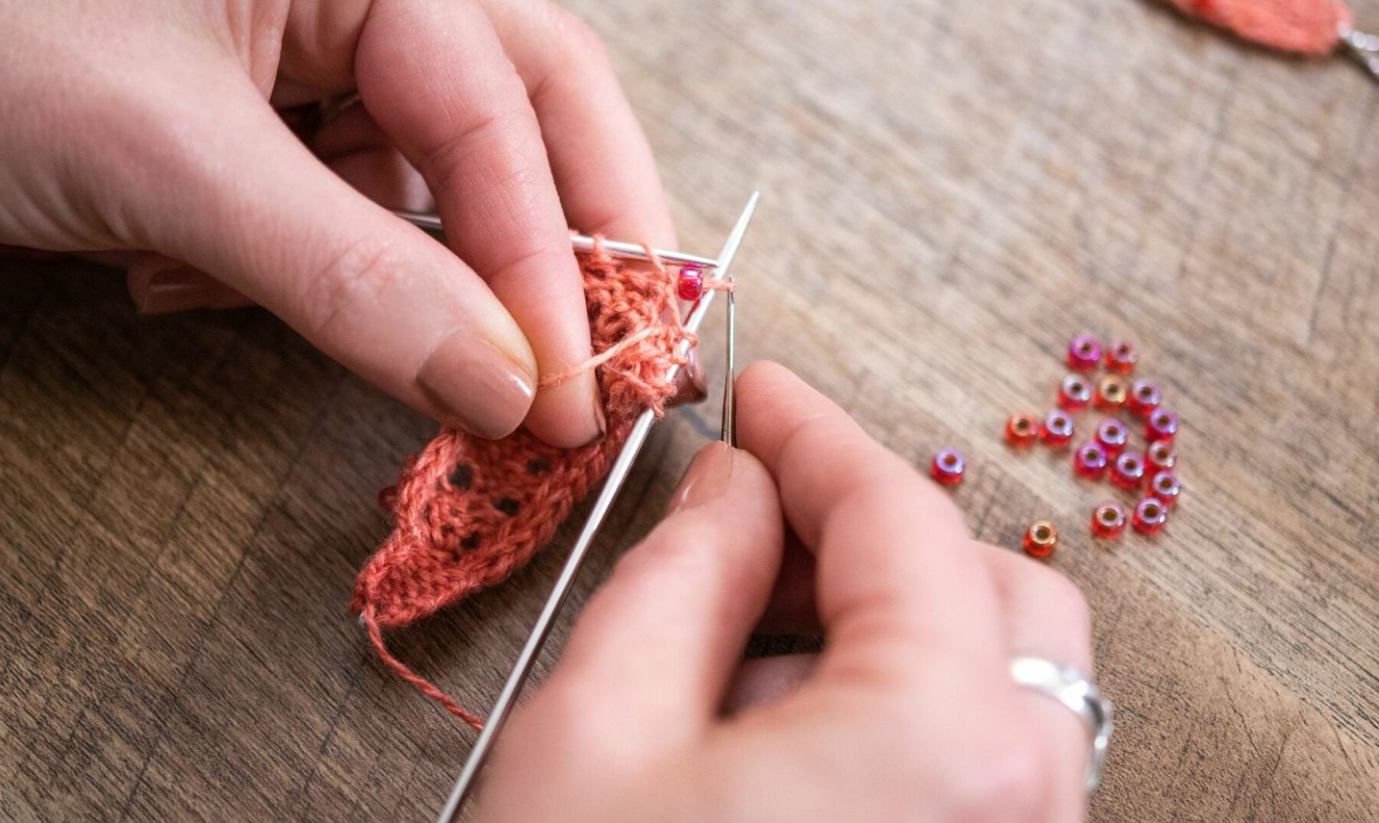
For this method you will need a crochet hook that fits into the hole of the beads you are using. This is my favorite method for beading.
Work until you reach the stitch you want to bead on. Make sure the beads you choose fit your crochet hook.
Beading: How to Attach Beads Using a Crochet Hook
Place a bead on the crochet hook, pull the stitch through the bead and slip the stitch back onto the left-hand needle.
Materials for knitting with beads
Most knitting patterns will call for a specific size or shape, usually with larger holes such as 6/0 seed beads (fit most sport/DK weight yarns) or 5/0 seed beads ( Fits worst worst weight yarn). These are large seed beads with rounded edges and they work beautifully with any pattern. These beads have a large hole size and slide easily on most yarns. You can also use smaller 8/0 seed beads (fits most finger weight yarn) for a more delicate look.
Another knitter’s favorite is the 5/0 Triangle Beads (TR5), which are triangle beads with gently curved edges. I love the look of this bead and I especially love the clear beads with the colorful lining. Choosing your own accent color for this fiber art technique is so much fun! There are so many options – clear and silver-lined, matte and natural, and color contrast. Try it yourself and see how different colors completely change the look and feel!
Before you can knit with beads, you need to thread the beads onto your yarn. The most common method is to pre-string the beads using a flexible wire needle or a ‘big eye’ needle. Most knitting patterns will call for a certain number of beads, so it’s best to check how many beads fit in a tube before starting to make sure. There’s nothing worse than coming up short when you’re in the middle of a project.
If you prefer to ‘bead as you go’ or like a more random flow to your piece, bead crochet allows you to add beads at any point using a small crochet hook. You’ll still need to pre-string your beads onto the yarn, but you can create a pattern or organic look by hooking each bead as you work. Make sure your crochet hook is small enough to go through the hole of the bead you plan to use.
Beadwork has been around since the Victorian era. It was popular to weave densely beaded purses using needles as small as 1 mm. Smaller than the smallest needles commercially available today! Small stitches like this allow for some very intricate patterns. Try adding beads to a purse or sweater to create a vintage and timeless look. Whether you’re creating a hat with beaded trim, a scarf or mittens, or the airiest shawl of fishnet, adding pearls to your creations makes them stand out. I love trying new things, especially when there’s such a big payoff. ‘Being creative means loving life.
An easy way to add beads to a knitting project as you go
Besides yarn and needles, the only two things we need to successfully incorporate beads into our knitting are beads and a threading tool.
The threading tool is very simple, and we can easily make it from any thin wire or piece of fishing line. I usually use 30 gauge wire, but any similar material in a similar gauge will work.
First, cut a piece of wire (or whatever material you are using) that is about 6cm / 2.5″ long. Then fold the piece so that one end is slightly longer than the other. Press the fold firmly to create a sharp crease and your threading tool is ready.
If you would like to receive the 10 most popular knitting lessons, please enter your name and the best email to reach you.
I will send you a lesson every week. That way, you’ll have a whole week to test out a new knitting tip or technique. Now, it’s time to find the pearls. Because beads come in so many different colors, shapes, and sizes, choosing beads for your project can be both exciting and challenging.
The rule of thumb here is to choose beads that have a hole large enough to fit a stitch through. Otherwise, trust your instincts and your vision of the future plan.
An easy way to add beads to a knitting project as you go
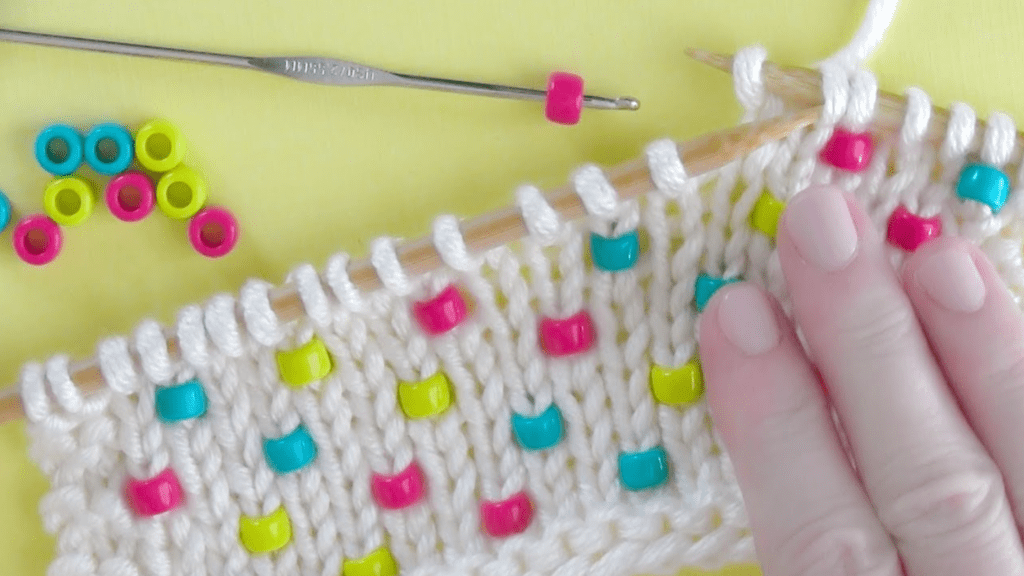
You can use the beads in the same color as the yarn (as I did below in my swatch) or in a slightly different color (see the middle of the swatch). You can also use beads in a contrasting color to create a more prominent accent or create a geometric design.
Use round beads or diamond-shaped beads, or beads in any other shape, but unless you want to achieve a specific effect, stay away from beads that are larger than the stitch, as these beads The shape of the fabric will be distorted.
Also, pay attention to the beads that are made of beads. The safest option is to use glass beads because they have a pleasant shine and can be washed with the project. To make the swatch featured in this tutorial, I used sock yarn and glass seed beads in size 6. Now, that we’ve created the threading tool and selected the beads, we can easily add them to our project whenever and wherever we want.
Here are three ways you can add beads to your knitting.
1. Wiring
Stringing beads means that all the beads needed for your project are threaded onto the yarn before you cast them on. If your thread is thin enough, you can use very fine sewing or tapestry needle to do this. If the yarn is thick, use a loop of sewing thread either sewn or glued to the end of the yarn.
You can also use a sewing needle threader, like the one I have below. Grab that thread – you’ll need it later.
Stringing beads onto yarn with needle thread
There are some drawbacks to this method of adding beads. First, you need to know – and count! – A correct number of beads required before casting. Since you can’t add more beads without breaking the thread, it’s a good idea to pre-string a dozen or so. You can always remove the ones you didn’t need in the end.
Another drawback is that you need to move the beads along the length of the yarn until you get to the point where they are needed. This can snag or tear your thread. For this reason I would only recommend using string for small projects with a small number of beads.
A pre-stitched bead sits on a single strand of yarn.
Beads that are pre-stitched on yarn are slightly different than the other two methods because the bead sits on a single strand of yarn. In the picture above you can see that the beads are only on the front loop of the stitch. The rest of the beads are waiting for their turn.
2. Looping
You can use sewing thread or even dental floss for this method. Dental floss has a waxy coating that makes it smooth and hard, great for attaching pearls.
A loop of dental floss with beads
Cut a length of dental floss and tie it into a loop. Slip the beads onto the loop from one end—you may need to use a sewing needle for this. It is a good idea to “load” more than one bead at a time.
Adding beads to the weave with a dental floss loop
To add a bead to your knitting, carefully pick up a stitch from the needle (scary!) and catch the stitch in a loop. Press the bead over the stitch, then place the stitch back on the needle, ready to continue knitting.
Looping beads with a needle threader.
A needle threader is also a small tool for this purpose. The metal wire on the threader is usually thin enough that you can easily slide small beads over it.
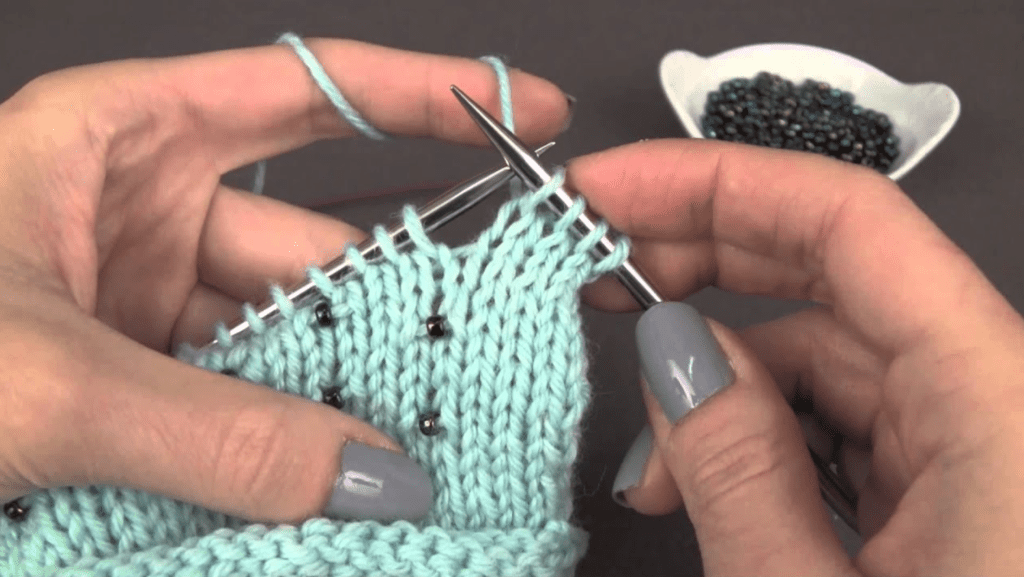
3. Lashing
I used the looping method for many years but now hooking has become my favorite way to add beads to knitting. This method is quick and easy but you need a special tool for it. I personally like to use a 0.6mm crochet hook. A similar tool is a FleegleBeader with a curved, curved end, a straight shaft onto which you can load multiple beads, and a stop to prevent beads from running away.
- Adding Beads to Knitting with a Crochet Hook
- To add a bead to your knitting, catch the bead on the crochet hook.
- Hold the stitch on the hook and slide the bead over the stitch.
- Slip the stitch off the needle and onto the hook. Slide the bead from the hook onto the stitch, making sure to catch all the edges.
- Place the stitch back on the needle
- Place the stitch back on the needle, ready to continue knitting.
Bead and knit or knit and bead?
Should you knit the stitch first and then bead it or the other way around? The two methods differ slightly in appearance and the pattern you are following will tell you which to do.
If you bead first, the bead will go under the row you are working on. This method is used in my Fenberry Shawl pattern, for example.
If you knit the first stitch, the bead goes on the same row you’re currently working on. This method is used in Lady of Light or Trick of the Light.
Tip
- Choose the right size knitting needle, to fit your beading needle properly.
- Place your bead on the crochet hook
- Bead on Crochet Hook
- Start your knitting project and knit as far as you want to go before placing any beads.
When you’re ready to attach your bead in place, use a crochet hook that’s smaller for smaller beads. Use the crochet hook conversion chart to measure correctly and see available sizes.
To prepare the bead to be placed on the knitting, slide it onto the crochet hook. You may need to use your fingers to get it there. Hold the knitted stitch
Knitting Stitch Hooking
When you’re at the point in the knitting stitch where you want the bead to sit, hook the stitch to your crochet hook with the bead on it, as shown in the example. If your thread has a lot of slippages, pinch the stitch at the base, so it doesn’t fall out.
- Keep the garland
Slide the bead onto the stitch
Slide the stitch through the knitting needle and bring the bead over the crochet hook and over the stitch, so that the bead is all around the stitch, which is securely attached to the crochet hook. Add more yarn as needed to hold the bead properly.
- Place the stitch on the needle
- Stitch and bead back on the needle
- Use the crochet hook, now held by the bead on the right-hand knitting needle, to help with the stitch.
Do not attempt to make the stitch.
- The stitch should have enough stretch that you can hold it over the needle even though the bead is taking up some of the stitch space.
- Finish the project.
- Complete beading
- Continue working the row, adding beads where you want.
- You can intentionally place beads in a project or part of a project, or place them randomly.
- On the wrong side of the work, you will stitch with the bead on it the same way you would stitch without the bead. Note that in the example in the picture, this means cleaning it.
- Repeat the steps outlined above to add as many beads as you can to your project.
Our fascination with threaded objects has been with us for a long time: an archaeological find of a shell bead, the earliest known to date, was discovered in 2006 and dated to around 100,000 years old. goes No wonder we’re inspired to try knitting with beads to create beautiful beaded knitting projects!
Did you enjoy this video? Check out more from our Yarn Hacks series!
The hardest part of knitting with beads is making your initial choices. Beads come in a variety of materials, sizes, shapes, and price points. Also, there are yarn related choices to make. Once you’ve decided how you’ll care for your project, what kind of yarn you’ll use, and what size, weight, and finish the beads should be, you can start adding them to your knitting. are ready for You can add as few or as many beads as you want to give your project a personal touch. Use beaded knitting for a cast-on edge, the body of your piece, or your bind-off edge.
- Woven with pearls
- Beading: A beaded cast-on edge
- Dress up an otherwise simple project by adding beads to its edge, such as on Nicole’s necklaces.
Colorful necklace on the model wearing a black shirt
To add beads to your cast-on edge, you’ll need to pre-string them. For a long tail cast-on, slide all the beads toward the tail end of the yarn. For the backward loop cast-on, slide all the beads toward the ball of yarn. Learn finishing techniques for your textures. Fina Guberstein teaches you how!
Learn how to create smooth selvage edges, top seams, custom-fit collars, and perfect necklines for every garment with this online video workshop.
CO 1 (or more) st(s), *slide 1 (or more) bead(s) near last st, CO next st(s); Rep from * until desired number of sts have been cast on.
The beads will stay in the space between the stitches on your needle.
Knitting with beads: Beads in the main body
There are many variations of weaving with beads, but they can all be divided into two camps: you either attach the beads, or pre-string them before you start weaving. Both methods have distinct differences, and unless the pattern makes it clear which method to use, you should be aware of their strengths and weaknesses.
Adding beads as you go: The hooked-on method
With this method, the beads always sit straight on a stitch. Keep this in mind if your project calls for a specific orientation of the beads.
Woven with pearls
1. Insert hook through bead and pvize in next st on LH needle.
2. Drop the LH needle to rest on the crochet hook.
3. Pull the set up through the bead hole.
4. Place back pull through st on LH needle.
5. Option 1: Continue with beaded stitches and knitting. The bead also shows on the WS.
6. Option 2: With the yarn in the back, slip towards the bead strip and continue knitting. The bead is covered with a strand on the WS.
Knitting With Beads: Hooked On Method Switch
- Change the green to white background.
- CO 23 sts.
- Row 1: (WS) K11, p1, k11.
- Row 2: (RS) Sl 1 pwise, M1R, k9, s2kp2 (see stitch), k9, M1L, k1.
- Row 3: Sl 1 pwise, k10, pBs (see stitches), k11.
- Row 4: Row 2 again.
- Row 5: Sl 1 pwise, p10, pBs, p10, k1.
- Rows 6–7: Repeat rows 4–5.
- Row 8: Sl 1 pwise, M1R, k4, pBk (see stitches), k4, s2kp2, k4, pBk, k4, M1L, k1.
- Row 9: Row 5 again.
- Row 10: Sl 1 pwise, M1R, k4, 3pBk, k2, s2kp2, k2, 3pBs, k4, M1L, k1.
- Row 11: Row 5 again.
- Row 12: Sl 1 pwise, M1R, k6, pBk, k2, s2kp2, k2, PBS, k6, M1L, k1.
- Row 13: Row 5 again.
- Rows 14–18: Repeat rows 2–3 twice, then work row 2 once more, ending with an RS row. Next row (WS) BO all stepwise.
Woven with pearls
stitches
S2kp2: Sl 2 sts as k2tog, k1, 2 slipped sts over knit st—pass 2 stsdec’d.
Place bead, slip a single stitch (PBS): Using a fine steel crochet hook, insert hook through the bead hole, place next st on the crochet hook and pull up through bead, return to LH needle, Removing hook, stepwise with yarn to front.
Place bead knit same stitch (pbk): Using fine steel crochet hook, insert hook through the hole in the bead, place next st on the crochet hook and pull up through bead, removing the hook, on LH needle. Put back, k1.
Pre-String Method: Beads between stitches.
With this method, the beads usually lie on a horizontal strand of yarn either at the front, back, or between the stitches. Some knitting techniques even manage to place the bead on the right or left leg of the stitch, slightly tilted to the right or left, respectively. In this case, the bead should be small enough to fit through the stitch.
The easiest way to knit with pre-string beads is to place them between the stitches. If you place a bead between two purl stitches, the bead will rest on your front side. If you place a bead between two knit stitches, the bead will face you.
Many knitters avoid it because they think it’s going to be difficult, but in reality, it couldn’t be further from the truth. Knitting with beads is an ancient art that can be done in many different ways. In this master class series with Jane Croft, you’ll discover four different ways to incorporate beads into your knitting.How to knit with beads.
Knitting with beads is incredibly satisfying, produces beautiful results (as evidenced by Martin Storey’s beaded cardi, pictured above), and is really easy to do.
Probably the most common method used is to work the yarn around the slip stitch with a bead. Another method – known as ‘bed knitting’ or ‘purse knitting’ – dates back to the 18th and 19th centuries, and is worked by placing a bead between two stitches. The third method is used so that the bead sits inside the knitted stitch. The final method involves a very small crochet hook that is used to attach the bead to the knitted stitch. For the first three methods, the beads are threaded onto the yarn before casting.
preparation
Choosing pearls
Beads come in all shapes and sizes, from handmade clay or papermache to machine-made plastic and glass. Any size bead and any weight of yarn can be used, as long as the hole in the bead is large enough to slide the yarn over without damaging or snapping. It’s also a good idea to check that the beads are washable and color fast. It is best to avoid delicate beads or sharp edges (such as cut glass), as they can affect the fabric during washing and wearing.
Other goods
You will need a strong sewing thread and a good sewing needle. If you find it difficult to thread with the palm of your hand, try placing a craft piece or thin flannel over a saucer or small bowl to hold the beads. For the crochet hook method, you will need a very fine hook – I used a 1.25mm size hook.
How to string beads.
- You will need it
- yarn
- A garland of beads
- Sewing needle
- Knitting needles
- Crochet hook
- Full Time:
- One afternoon
- Step No. 1
The needle size that is usually used to sew knitting yarn is much larger than the size of the thread beads, so below I will show you how to get the beads onto your knitting yarn. How to make your own version of a needle threader. For the first three beading methods, it is important to thread the beads onto the yarn before inserting them. To do this, thread the needle with the sewn cotton thread and make a small knot by connecting the ends to form a loop.
How to Knit with Beads Step 1
Step 2
- Move the knot so that it does not line up horizontally with the sewing needle.
How to Knit with Beads Step 2
Step 3
Place the knitting yarn through the loop made with the sewing thread, then pass the beads over the eye of the needle. Push it down onto the sewing thread and then onto the knitting thread…
How to Knit with Beads Step 3
The first few beads can be a little tricky, but unless you’ve chosen very small beads, threading will be easy. Sometimes you’ll see a bead that has a smaller hole than others or a slight defect, so it’s a good idea to thread the beads onto the string in small fields. I thread about five beads at a time. If you are using a large number of beads, it may be necessary to thread the beads onto the yarn in sections – too many pre-stitched beads can make knitting difficult, and the tension and appearance of the yarn Can affect the shape.
Knitting with beads: method 1
- Beading using a slip stitch
This is a really effective method of beading and is the preferred method of most knitwear designers. Martin Storey uses it in his Carnival Cardigan design in The Knitter, Issue 4, page 20. Using this method beads can be placed on every alternate stitch and every alternate row.
- Place bead on the right side (RS) row
Step No. 1
Thread and insert the required number of beads. Work through the knitting chart to find where you need the beads. In Martin’s pattern, it is symbolized by a filled black square.
How to Place a Bead with Slip Stitch Step 1
Step 2
- With the yarn on the reverse side of the work, bring a bead up to the top of the yarn you just made. Bring your thread to the front – as if to knit – making sure the bead also comes to the front.
How to Place a Bead with Slip Stitch Step 2
Step 3
Slip the next stitch across. Pass the yarn back and forth between the two needles, making sure the bead sits in front of the sewn stitch. You want to hold it in place with the thumb of your left hand. Make the next stitch as usual. . . . To place a bead on a wrong side (WS) row: Work as above until *. Because you are on a purl row your yarn will already be in front of the work. Work a bead up to the top of your knitting yarn.
Knitting with beads: method 2
1. Beading between two stitches
This technique was traditionally used for jewelry and fine decorative items. The thread used was very fine, like sewing cotton, while the knitting needles were very thin and the beads small. This technique – if used with today’s yarn knitting – has a tendency to stretch the knitting, and the beads can be pushed to the wrong side of the work. However, if used correctly, it is quick and easy.
The same method is used on both the right and wrong sides of the work. Thread the desired number of beads onto the yarn and cast. Work through the knitting chart to find where you need the beads. Slide the bead over the yarn and keep it as close to the weave as possible. Work the next stitch in the pattern. The bead will sit between the two stitches.
Knitting with beads: method 3
Place the bead inside the stitch
This is probably the fastest way to add beads to your knitting. However, the bead can easily slip to the reverse side of the work. Once placed, the bead is held inside the stitch and lies at a slight angle to one side.
Placing beads in right side (RS) row:
1. Step No. 1
Work where beads are needed. Insert the right needle into the stitch.
How to Place the Bead Inside the Stitch Step 1
2. Step 2
Slide the bead over the yarn until it does the job.
How to Place the Bead Inside the Stitch Step 2
3. Step 3
Knit the next stitch, pushing the bead through the stitch so that it appears on the right side of the work. Knit the next stitch tightly…
Placing beads on a wrong side (WS) row:
1. Step No. 1
Work where beads are needed. Insert the right knitting needle purlwise into the stitch and wrap the yarn as if to purl.
How to Place the Bead Inside the Stitch Step 3
Step 2
- Slide the bead over the yarn until the bead does the job…
- How to Place the Bead Inside the Stitch Step 4
- Step 3
- Press the bead right side through the stitch and complete the stitch.
Knitting with beads: method 4
1. Using a crochet hook
- I was recently taught this technique by a workshop participant. It’s a bit fiddly, but a fantastic way to add beads as you go. Pre-threading the beads is not required, but you will need to get a really small hook.
2. Step No. 1
- Work where you want the beads. Thread the bead onto the crochet hook. Slip the next stitch off the left needle and onto the crochet hook. Knitting with beads using a crochet hook Step 1
3. Step 2
- Push the bead down the crochet hook and onto the stitch…
- Knitting with beads using a crochet hook Step 2
4. Step 3
- Place the stitch back on the left needle. Sew as usual.
- We will place a bead on a stitch. So decide where you want to add the bead and stop right after working that stitch.
- For example, in my swatch, I want to place a bead above the double vertical decrease that forms the bottom of each shape. So I decrease and don’t make any more until I add a bead to that stitch.
- An easy way to add beads to a knitting project as you go
- If you plan to create a specific design with the beads or incorporate them into a particular pattern, it helps to make a chart and mark the places where you want the beads to appear in your project. This way, you will know exactly where each bead should be placed.
- Insert the long end of the threading tool through the right needle tip into the first stitch (this is the stitch that will be beaded).
- An easy way to add beads to a knitting project as you go
- It doesn’t matter whether you insert the threading tool from left to right or from right to left. Try both methods and choose the direction you feel most comfortable.
- Take a bead and thread it on the threading tool. Place it on the long end of the tool first, and then slide it down from both ends.
- An easy way to add beads to a knitting project as you go
- If the hole in the bead is small and the wire used to make the threading tool is thicker than 30 gauge, it may be difficult to thread the bead through both ends of the tool at the same time. This is why we didn’t fold the wire in half when we made the tool – the uneven ends make it easier to thread the bead.
- Move the threading tool toward the right needle tip until you pull the stitch away from the needle.
- An easy way to add beads to a knitting project as you go
- Soldering with a needle is always a little scary. Don’t worry – the sewing threading is securely attached to the tool and there’s no way the tool will loosen it.
- Push the bead down with the threading tool all the way to the bottom of the stitch.
- An easy way to add beads to a knitting project as you go
- Use the threading tool to place the stitch back onto the right needle.
- An easy way to add beads to a knitting project as you go
- Remove the threading tool from the stitch and continue working on the project.
- An easy way to add beads to a knitting project as you go
- Repeat these steps every time you want to add beads to your project and see how this simple trick turns a basic knitted creation into a stunning work of art.
Multi-colored beads.
You can create a really effective design by using different colored beads. To do this, mark your bead colors on the graph using a different symbol for each color. Thread your beads onto your thread in reverse order, reading the graph from top to bottom and left to right in each beaded row. If you’ve done this correctly, the beads will come out in the correct order as you weave.