I’ve used a triple wrap here for the longer stitches, but you can wrap the yarn as many or as few times as you want to make your fabric. The more wraps, the longer the space between rows. (It also uses more yarn so keep that in mind as you experiment.) If you’re following a pattern, it should tell you how many times to wrap the yarn around the needle to give you an estimate. Don’t need to.
Equipment needed:
Yarn
- Appropriate size knitting needles
- Preparing for change:
- Cast on a handful of stitches and make a few rows in garter stitch
Right side row:
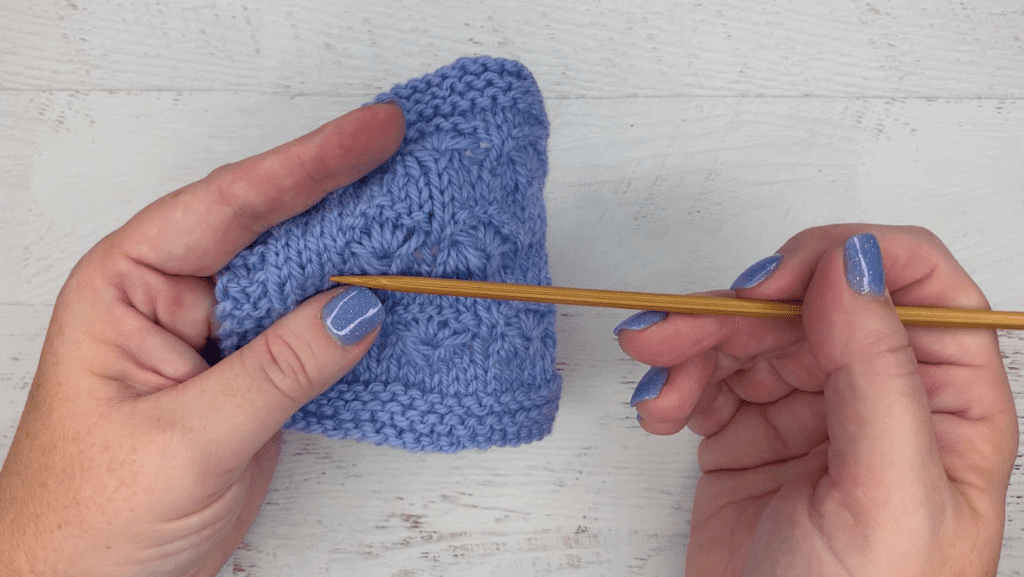
- Step 1. Insert the right needle as if to knit.
- Step 2. Wrap the yarn around the tip of your right needle 3 times.
- Step 3. Complete the knit stitch, as usual, keeping all 3 wraps on the right needle.
Repeat steps 1-3 for each length of stitch required.
wrong side row:
- Step 1. Insert the right needle into the next triple-wrapped stitch as if to knit.
- Step 2. Complete the knit stitch as you normally would, dropping 2 extra wraps from the left needle as you go.
Repeat 1 and 2 across all the triple-wrapped stitches from the right side row.
Row 1: K1-WRAP # times
Insert the right needle into the stitch and wrap the yarn around the right needle the prescribed number of times, then pull the right needle out of the stitch with the extra wrap. Count only the first wrap for each stitch in the total stitch count.
Alternative words for row 1:
K1-wrapping yarn # bar # creates a knit stitch with loops. This is like a double yarn over. However, instead of increasing, you are keeping your stitch count the same.
Go into sewing as knitting. Wrap the thread loosely around the needle the number of times indicated, pulling through all the loops while making the stitch.
Alternate row 1: P1-WRAP # bars
The p1-wrapping yarn makes a single purl stitch with # bar # loops. This is like a double yarn over. However, instead of increasing, you are keeping your stitch count the same.
Go into a purl stitch. Wrap the thread loosely around the needle the number of times indicated, pulling through all the loops while making the stitch.
Row 2: Wrap K1-drop.
As the stitch is being made into the first wrap, let all the extra wraps come off the left needle to make a long stitch.
Alternate row 2: Wrap P1-drop.
As the stitch is being cleaned in the first wrap, let all the extra wraps come off the left needle to make a long stitch.
- Skip the next stitch.
- Slip the next stitch off the left needle and let it fall (it may start to unravel).
- Specific pattern variations for increased stitches
Sometimes, I include variations of the technique that are specific to patterns. I always include instructions for specific techniques in the pattern itself, so be sure to read the pattern you’re working on as well.
Make a long stitch for TAOS
Use the tip of the right needle to slip the first stitch from the left needle onto the right needle, allowing the additional three loops to drop, creating a long stitch on the right needle.
Cross for TAOS
Use the tip of the right needle with the left needle in front of the first four lengthened loops to pass through the elongated loop of the 5th, 6th, 7th and 8th loops. Gently lift these loops to the 4th, 3rd, 2nd, and 1st loops and hold in the new position with the left hand. Knit each long loop in this new order.
K1 wrapping 4 (8) times for TAOS
Go to the first stitch on the left needle to knit. Do not complete the knit stitch until you have wrapped the right needle 4 or 8 times the specified total number of times. Then pull the right needle through the stitch, bring all the envelopes through the stitch and place them on the right needle.
Rapping 4 times for K2TOG TAOS
Go into the first two stitches on the left needle as a k2tog. Do not complete the k2tog until you have wrapped the right needle 4 times. Then pull the right needle through 2 stitches, bring all the wraps through the stitches and place them on the right needle.
Pattern, knitted flat:
Using your smaller knitting needle size:
In any number of CO STS
Row 1 {WS}: *K*
Row 2 {RS}: *K*
Row 3 {WS}: *K*
Row 4 {RS}: *K*
Go to your larger needle size:
Row 5 {WS}: *K*
Row 6 {RS}: *K*
Repeat rows 1-6 to the desired length.
Tip:
Place a stitch marker on the wrong side line to help remind you to change needle size.
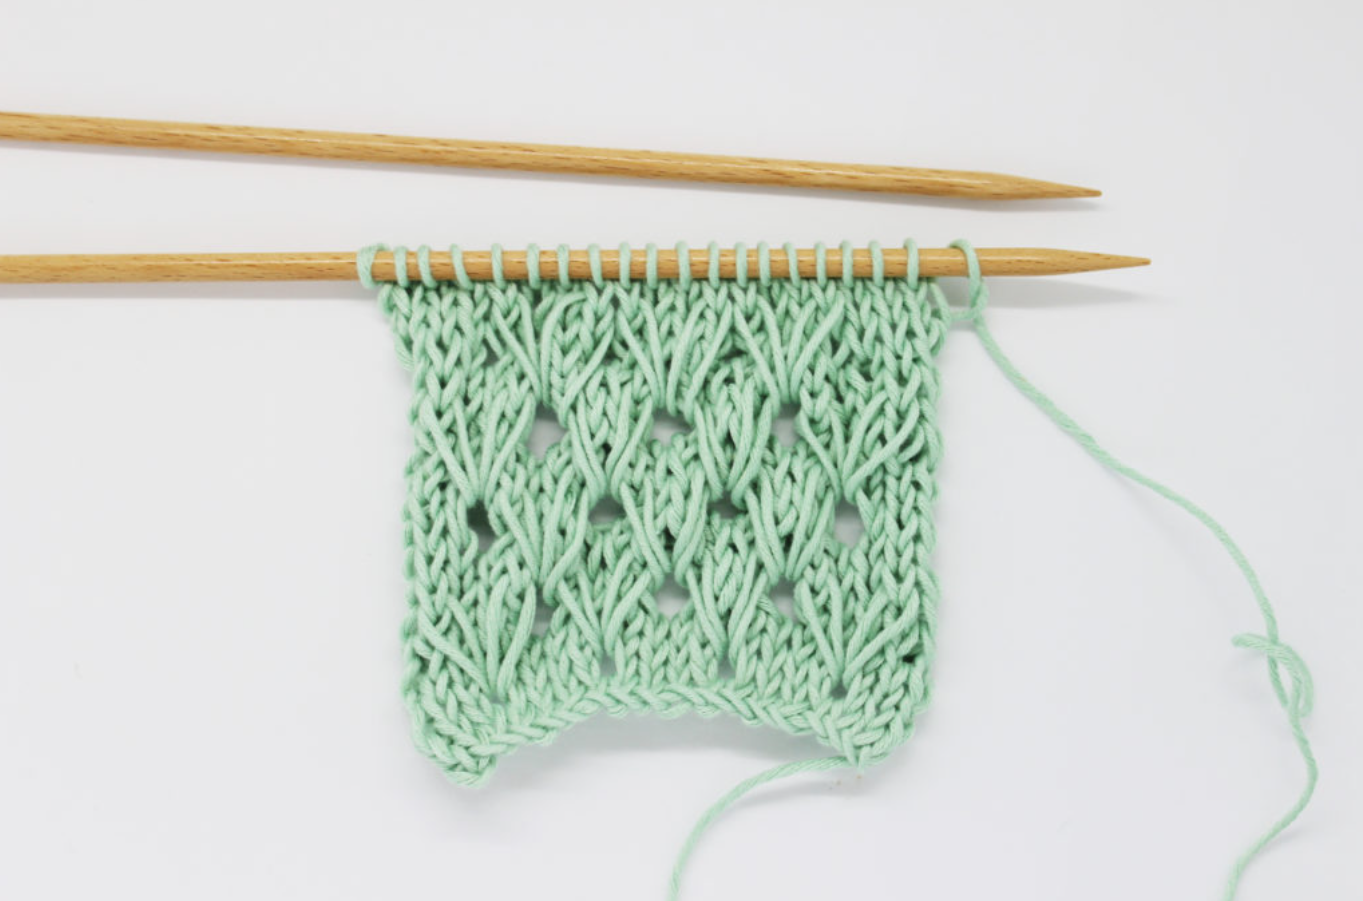
Using the long lace knit stitch:
This is an easy way to make a long stitch without using yarn overs {although we’ll learn that tomorrow!}
The thinner the yarn you use and the larger the needle, the longer your stitch length will be, giving you a lacey look with no increases or decreases.
It would work great for designing a seamless scarf, easy triangle shawl, chunky wrap or cotton summer tank top.
Examples:
- Long knit stitch switch using Malabrigo Rios yarn
- Malabrigo Rios in Pearl with size 6 and 11 needles
- Long knit stitch switch using Malabrigo sock yarn
- Malabrigo Sock in Natural with Sizes 6 and 11 Needles
Advanced pattern, flat knit with a clean edge:
Using your smaller knitting needle size:
In any number of CO STS
Row 1 {WS}: WYIF S1PW *K* WYIF S1PW
Row 2 {RS}: K1TBL *K* K1TBL
Row 3 {WS}: WYIF S1PW *K*
Row 4 {RS}: K1TBL *K* K1TBL
Go to your larger needle size:
Row 5 {WS}: WYIF S1PW *K*
Row 6 {RS}: K1TBL *K* K1TBL
Repeat rows 1-6 to desired length.
Abbreviations:
- – * – Repeat the pattern.
- BO – Bind off in pattern
- CO – Cast On {Long Tail Cast On Method}
- K – Knit Stitches {K1 means knit 1 stitch}
- K1 TBL – Knit 1 stitch through the back loop
- RS – Right side
- S1PW – Slip a stitch purl count.
- STS – Stitches
- WYIF – with yarn in front
- WS – wrong side
How to make a long stitch.
Difficulty level
easy
method
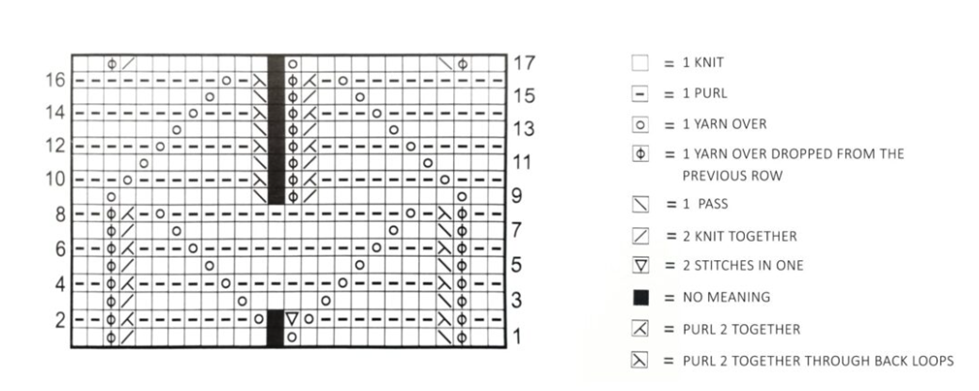
This is done on the basis of 24 stitches.
The first row: knit 2, yarn over 1, pass 1, knit 8, yarn over 1, knit 8, 2 together, yarn over 1, knit 2.
Second row: purl 2, drop yarn from the previous row, yarn over 1, purl 2 together, purl 7, yarn over 1, 2 stitches in one, yarn over 1, 7, purl 2 to back loops. Through together, drop yarn from the previous row, yarn over 1, and purl 2.
To make 2 stitches in one: purl 1 and purl 1 through the back loops in the same stitch.
Third row: Knit 2, drop yarn from the previous row, 1 yarn over, 1 pass, knit 6, yarn over 1, knit 4, yarn over 1, knit 6, 2 together, drop yarn over the previous row. Row, yarn over 1, knit 2.
Fourth row: purl 2, drop yarn from the previous row, yarn over 1, purl 2 together, purl 5, yarn over 1, purl 6, yarn over 1, purl 5, purl 2 through back loops. Put together, and drop the yarn. Up from the previous row, purl 1, purl 2.
5th row: knit 2, drop yarn over the previous row, yarn over 1, pass 1, knit 4, yarn over 1, knit 8, yarn over 1, knit 4, 2 together, yarn over previous drop Row, yarn over 1, knit 2.
6th row: purl 2, drop yarn from the previous row, yarn over 1, purl 2 together, purl 3, yarn over 1, purl 10, yarn over 1, purl 3, purl 2 from back loops, Drop yarn up from the previous row, yarn over 1, purl 2.
7th row: Knit 2, drop yarn from the previous row, yarn over 1, pass 1, knit 2, yarn over 1, knit 12, yarn over 1, knit 2, 2 together, drop yarn over previous. Row, yarn over 1, knit 2.
8th row: purl 2, drop yarn from the previous row, purl 1, purl 2 together, purl 1, purl 1, purl 1, purl 1, purl 1, purl 2 through back loops. Put together, and drop the yarn. Up from the previous row, purl 1, purl 2.
9th row: Knit 2, skip yarn over the previous row, yarn over 1, knit 8, knit 2 together, yarn over 1, yarn over 1, knit 8, drop yarn from the previous row, 1 over Yarn, knitting 2.
10th row: purl 3, yarn over 1, purl 7, purl 2 through back loops together, drop yarn from the previous row, yarn over 1, purl 2 together, purl 7, yarn over 1, 3 Pearl.
11th row: knit 4, yarn over 1, knit 6, knit 2 together, drop yarn from the previous row, yarn over 1, pass 1, knit 6, yarn over 1, knit 4.
12th row: purl 5, yarn over 1, purl 5, purl 2 through back loops together, drop yarn from the previous row, yarn over 1, purl 2 together, purl 5, yarn over 1, 5 Pearl.
13th row: Knit 6, yarn over 1, knit 4, knit 2 together, drop yarn over previous row, yarn over 1, pass 1, knit 4, yarn over 1, knit 6.
14th row: purl 7, yarn over 1, purl 3, purl 2 together through back loops, drop yarn from the previous row, yarn over 1, purl 2 together, purl 3, yarn over 1, purl 7.
15th row: Knit 8, yarn over 1, knit 2, knit 2 together, drop yarn from the previous row, yarn over 1, pass 1, knit 2, knit 1 yarn over, knit 8.
16th row: Purl 9, up yarn 1, purl 1, purl 2 through back loops together, drop yarn from the previous row, up yarn 1, 2 purl together, purl 1, up yarn 1, purl 9 .
17th row: Knit 2, yarn over 1, pass 1, knit 8, drop yarn from the previous row, yarn over 1, knit 8, 2 together, 1 yarn over, knit 2.
18th row: Repeat from the second row.
Long stitch: The structure of the knitting stitch
I’ve been writing a series of sporadic posts about the construction of various knitting stitches. I’m in the middle of an increasing series, and before I get into the different ways to increase by making existing stitches, I want to talk about a technique that at first glance looks like it should be an increase. , but is not.
My experience learning to knit as a child and teenager was uneventful. Some things I learned from other people or from books, and some other things just by trying. One thing I tried on occasion was turning an already made stitch into two stitches by knitting it twice. I was surprised to find that it wasn’t working. Instead, it created a stitch, but by wrapping the yarn around the needle twice instead of once. At that time, I did not understand why but just accepted it. Later I learned that this is a useful way to introduce some slack into sewing by purpose. This is called a long stitch.
This post is written to explain why.
My other stitch texture posts can be found in my stitch texture tag.
Notice:
These posts are not intended as instructions on how to work these stitches. Instead, I’m showing the resulting stitch structure. To help with this, I’m not showing the needles in the stitches because I think they make it hard to see the texture of the fabric.
The thread is made much thinner than the stitch size, which will be practical for actual knitting. This makes the texture easier to see, but it doesn’t look exactly like the final weave.
A column of two existing knitted stitches with a strand of thread waiting to be pulled through the top stitch to form a new stitch.
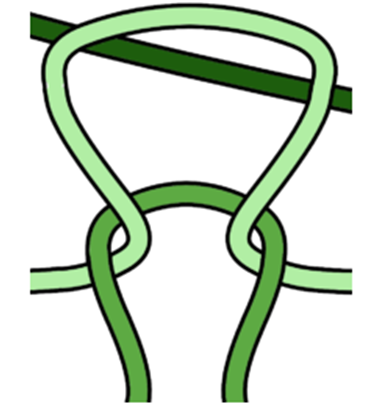
Here is a column of two existing knit stitches. The bottom one, in medium dark green, is just to show how the lower part of the light green is held in shape. The light green knit stitch is from the previous row with a new stitch to be made. The dark green yarn is going to be pulled through the light green stitch.
The light green stitch is made larger not because it actually is, but because it will make the structure of the loops more obvious in the next two examples.
A loop of dark green yarn is pulled through a light green stitch to form a single knit stitch.
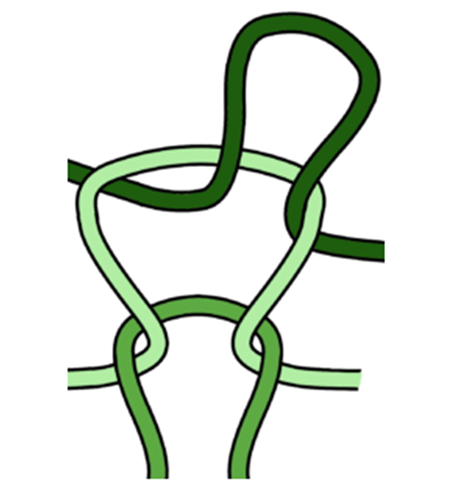
A loop of dark green yarn is pulled through a light green knit stitch to create a new knit stitch.
There are two loops of dark green drawn through the light green stitch in a knitted fashion. This is a delusion. The yarn wiggles up and down, but the middle wiggle isn’t anchored to anything.
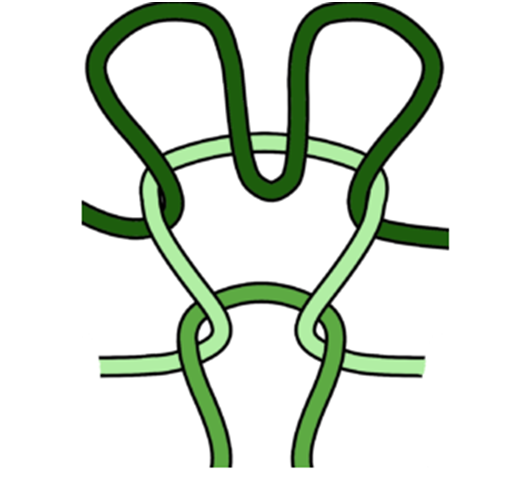
A second dark green loop is pulled through the same light green knit stitch as the second knit stitch. The sneaky thing about this is that if you really do it, it looks like two stitches are knitted on the needle—but it’s really just the yarn being wrapped twice. (If you’re doing this on purpose, it’s easier to just wrap the yarn twice instead of pulling two separate loops.) If you look at the example above, the dark green yarn loops up and down twice, But only the outer two. . The bits are anchored with light green stitching. The U shape in the middle is just resting in place, with nothing holding it.
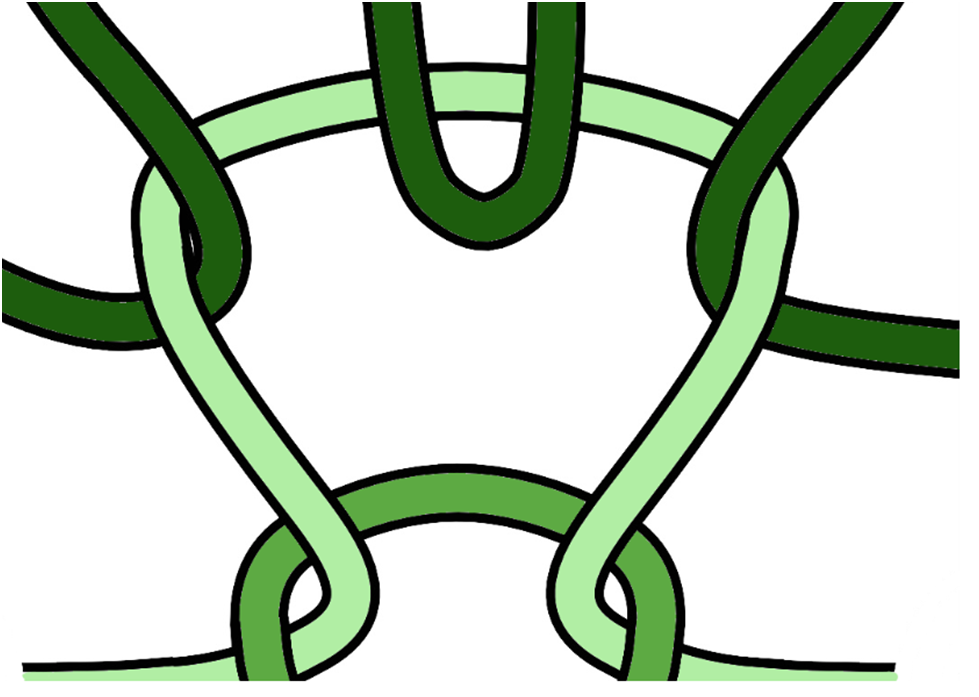
A column of three knit stitches. The bottom two stitches are pulled to the same size as each other. The top stitch is twice as long.
When the needle is removed, it becomes a long stitch that is actually larger than the other stitches because the yarn is wrapped around the needle twice.
Long stitches are useful in some situations. I sometimes use them if I’m going to slip stitch and don’t want to pull the yarn through the stitches. They are also good for the lace effect. Here’s a long sewing tutorial from Interweave that shows what it looks like in use and on the needles. (There are long stitches wrapped three times, but the principle is the same.)
Long drop stitch
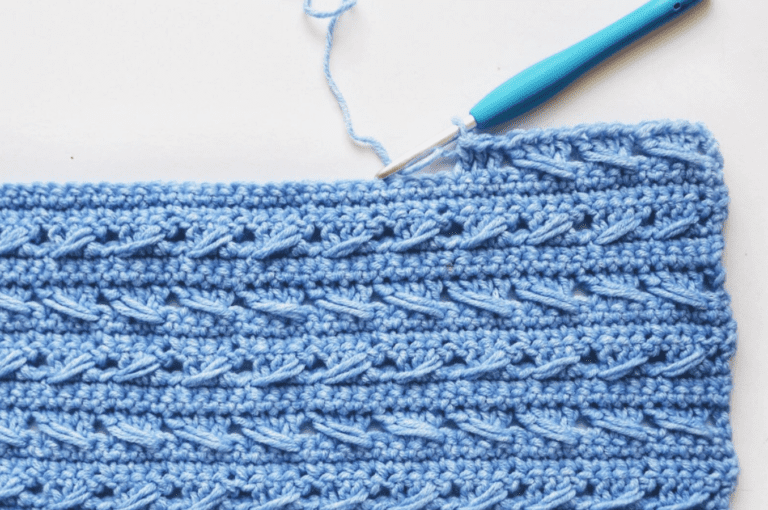
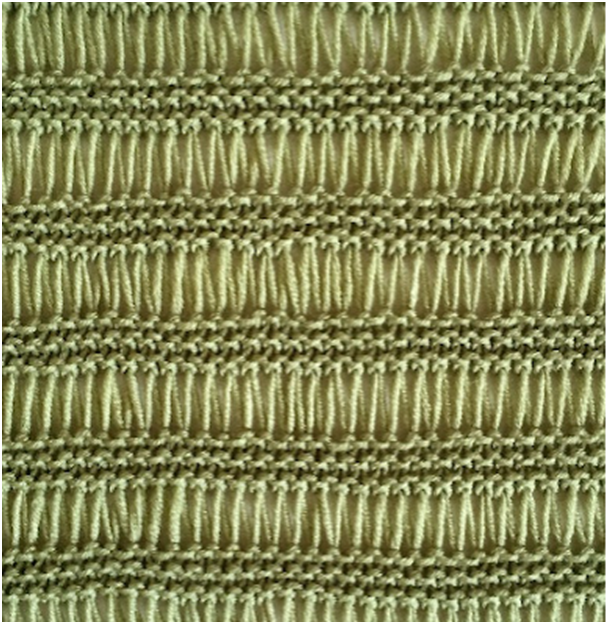
An elongated drop stitch is a light and airy stitch pattern created by wrapping the yarn around the needle a few times and then dropping the extra wraps off the needle in the following row. The more times the yarn is wrapped around the needle, the longer the stitches will be.
I found that after pulling the fabric lengthwise and dropping the row, the envelopes would also have looseness and stitches. Avoid an edge stitch as this will cause distortion of the edges as the edge stitch will be shorter in length than the other stitches in the row. Even careful blocking of stitches is recommended.
Textured or different-colored yarn will add extra drama and interest. Also, experiment with additional wraps around the needle to create long, dropped stitches, but as you increase the number of wraps you may want to increase the number of garter stitch rows to maintain fabric stability. will
It’s a reversible and decorative stitch that also drapes well, making it a good choice for scarves and shawls.
Long drop stitch
(any number of stitches)
Knit from rows 1 to 5
Row 6 *K1 Wrap yarn around needle 3 times. Repeat from * to the end of the row.
Note: When working the next “knit” row, knit each stitch so that the wrap falls off the needle.
These 6 rows make a long drop stitch.
Long cable knit stitch
(More than 6 stitches are required.)
Row 1 (right side): Knit all stitches.
Row 2 (wrong side): Purl all stitches.
Row 3: K1, *wrap the yarn over needle twice, k1, from * to last stitch, k1.
Row 4: *Slip 6 stitches from left-hand needle to right-hand needle, drop extra loops of yarn (thus making long stitches), slip 6 stitches to left-hand needle, slip 3 stitches to cable needle ( CN) ) and back of work, p3, hold with p3 sts CN, rep. From * to the end.
Row 5: Knit all stitches.
Row 6: Purl all stitches.
Repeat rows 3 to 6 for the pattern.
Elongated-Stitch Waves
Multiple of 8 stitches plus 6 additional stitches
| Colors A and B. | ||||||
| Repeat rows 1 – 12 | ||||||
| Row # | Side | Color | Begin Row | Repeat | Repeat From * | End Row |
| 1 | R | A | k1* | k4 wrapping yarn twice arround needle for each stitch, k4 | * | k4 wrapping yarn twice for each st and dropping extra wraps of previous row, k1 |
| 2 | W | A | p1* | p4 wrapping yarn twice for each st and dropping the extra wrap of previous row, p4 | * | p4 wrapping yarn twice for each st and dropping the extra wrap of previous row, p1 |
| 3 | R | A | k1* | k4 wrapping yarn twice for each st and dropping extra wraps of previous row, k4 | * | k4 wrapping yarn twice for each st and dropping extra wraps of previous row, k1 |
| 4 | W | A | p1* | p4 wrapping yarn twice for each st and dropping the extra wrap of previous row, p4 | * | p4 wrapping yarn twice for each st and dropping the extra wrap of previous row, p1 |
| 5 | R | B | * | knit all elongated sts once, drop all extra wraps of previous rows | * | |
| 6 | W | B | * | knit | * | |
| 7 | R | A | k5* | k4 wrapping yarn twice for each st, k4 | * | k1 |
| 8 | W | A | p5* | p4 wrapping yarn twice for each st and dropping extra wrap of previous row, p4 | * | p1 |
| 9 | R | A | k5* | k4 wrapping yarn twice for each st and dropping extra wrap of previous row, k4 | * | k1 |
| 10 | W | A | p5* | p4 wrapping yarn twice for each st and dropping extra wrap of previous row, p4 | * | p1 |
| 11 | R | B | * | knit all elongated sts once, drop all extra wraps of previous rows | * | |
| 12 | W | B | * | Knit | * |
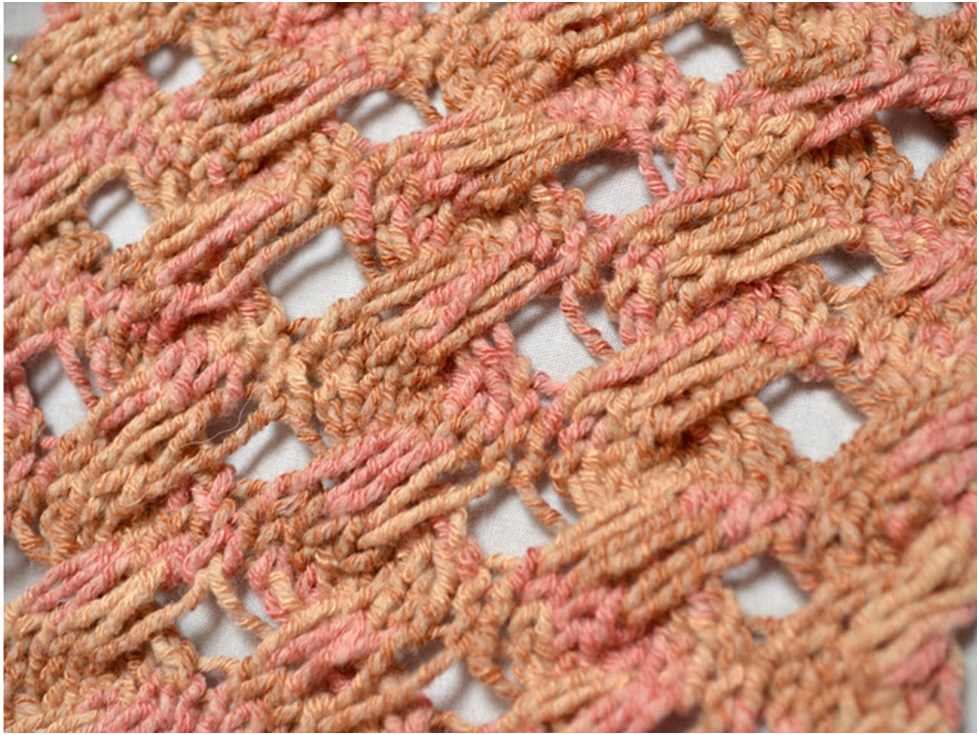
Elongated Diamond Lace Stitch Pattern
Pattern Description
Elongated Diamond Lace Stitch Pattern is an elegant lace pattern that is worked over 24 rows and repeating multiples of 14 stitches. Although it is a long pattern, you only need to be familiar with the most basic lace knitting stitches like pass slipped stitch over (psso), knitting 2 stitches together (k2tog), and yarn over (yo).
Unlike many other lace openwork patterns, this one does not have a feminine vibe so it can work well on men’s pullovers, sweaters, and scarves.
Pattern Details
Skill Level
Intermediate
Row Count
24
Pattern Repeat
Multiple of 14
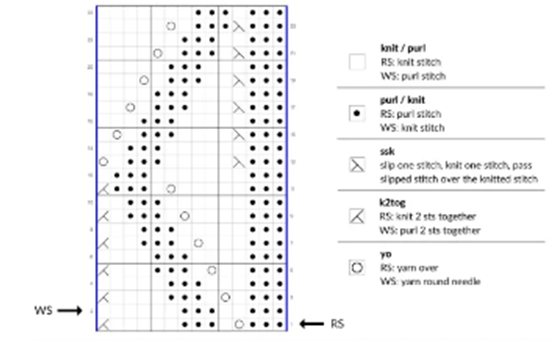
Elongated Diamond Lace Stitch Pattern Chart
Abbreviations
This free-knit pattern is written in US terms. You can also check out other common knit abbreviations.
- CO- Cast on
- K- Knit
- k2tog -Knit 2 stitches together
- p- Purl
- psso- Pass slipped stitch over
- rep- Repeat
- RS- Right side
- WS- Wrong side
- Yo -Yarn over
Pattern Instructions
CO Multiple of 14.
Row 1: (RS) * p3, yo, k1, p3, k5, k2tog; rep from * to end.
Row 2: * p6, k3, p2, k3; rep from * to end.
Row 3: * p3, k1, yo, k1, p3, k4, k2tog; rep from * to end.
Row 4: * p5, k3, p3, k3; rep from * to end.
Row 5: * p3, k2, yo, k1, p3, k3, k2tog; rep from * to end.
Row 6: * p4, k3, p4, k3; rep from * to end.
Row 7: * p3, k3, yo, k1, p3, k2, k2tog; rep from * to end.
Row 8: * p3, k3, p5, k3; rep from * to end.
Row 9: * p3, k4, yo, k1, p3, k1, k2tog; rep from * to end.
Row 10: * p2, k3, p6, k3; rep from * to end.
Row 11: * p3, k5, yo, k1, p3, k2tog; rep from * to end.
Row 12: * p1, k3, p7, k3; rep from * to end.
Row 13: * p3, sl 1, k1, psso, k5, p3, k1, yo; rep from * to end.
Row 14: Rep Row 10.
Row 15: * p3, sl 1, k1, psso, k4, p3, k1, yo, k1; rep from * to end.
Row 16: Rep Row 8.
Row 17: * p3, sl 1, k1, psso, k3, p3, k1, yo, k2; rep from * to end.
Row 18: Rep Row 6.
Row 19: * p3, sl 1, k1, psso, k2, p3, k1, yo, k3; rep from * to end.
Row 20: Rep Row 4.
Row 21: * p3, sl 1, k1, psso, k1, p3, k1, yo, k4; rep from * to end.
Row 22: Rep Row 2.
Row 23: * p3, sl 1, k1, psso, p3, k1, yo, k5; rep from * to end.
Row 24: * p7, k3, p1, k3; rep from * to end.
Repeat this free knit pattern (24 rows) until you have reached the desired length for your work.
Shawl by knitting elongated stitch
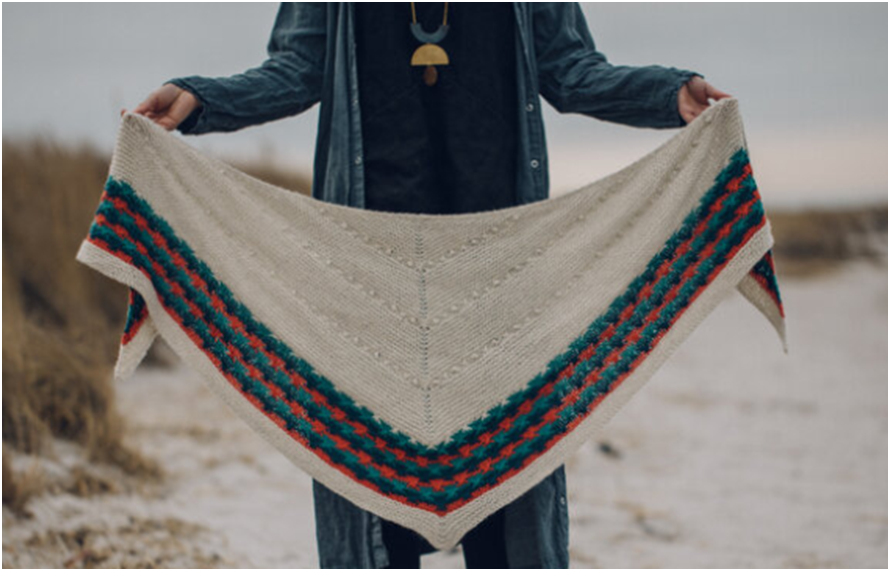
Details
This shawl features a squishy garter, long stitches, bobbles, soft drapey yarn and a few pops of color – the basic ingredients of a fun and comfortable and wearable shawl! The long cross stitches and bobbles remind me of X’s & O’s – wrap yourself in some hugs and kisses!!
Full measurement
- Wingspan – 79”/200.5 cm
- Depth – 26”/66 cm
Yarn requirements
These are just estimates. Total yarn usage will depend on the yarn you use (fiber material, ply, etc.), your personal gauge, and any modifications you may make.
- Poor weight baby yak in 4 colors
- A – 150 grams/375 yards/343 meters
- B, C, and D – 36 grams/88 yards/81 meters (each)
Recommended yarn
For this shawl, I chose worsted spun baby yak – which has a similar feel to cashmere. It’s warm and shiny, lightweight and breathable, making it perfect for all seasons. This worsted-weight yarn makes an incredibly squishy shawl with a wonderful drape!
Myak Baby Yak Medium – 100% Baby Yak (50 g/125 yd/117 m)
- A – 3-4 Scones Oatmeal (Off White) See note below
- B – 1 Scan Emerald (Turquoise)
- C – 1 Scan Petrol (Navy Blue)
- D- 1 skin saffron (poppy red)
I used 3 scans for my sample, but one of my testers needed 4. Due to variations in knitting style and gauge, I recommend buying a 4th skein just in case!
Recommended needles
- Size US 8/5mm – 32″/80cm – 40″/100cm Circular
(Use needle size to get gauge.)
Concepts
Stitch markers (2), locking stitch markers (2 – optional), small crochet hook for bobbles (a repair hook works great, or I like a size E crochet hook), row counter (optional), tapestry needle
Gauge
- 15 sts and 26.5 rows = 4”/10 cm
After blocking, the garter stitch was measured.
- Joining techniques
- Garter tab cast on
- knitting
- increase
- Bubbly
- Long stitches
- Crossing long stitches
- Changing colors
- Jenny’s amazingly stretchy bind-off
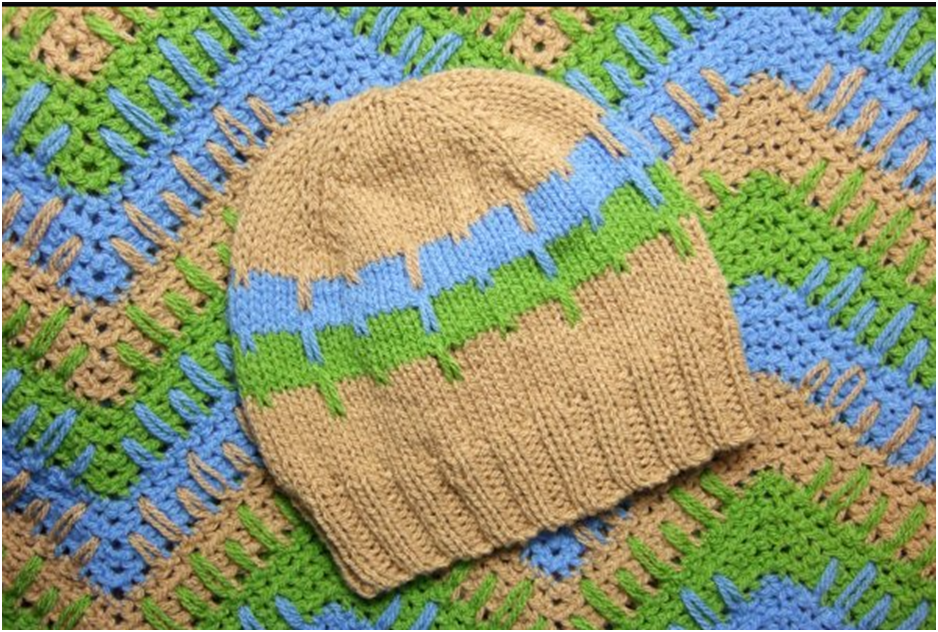
Knit elongated stitches baby hat
I made this baby hat to coordinate with the Crocheted Baby Blanket Downy-Soft Zig Zags published in Leisure Arts #2853, Our Best Baby Afghans by Carole Prior. It has long stitches to mimic long double crochet in a blanket.
This is about a twelve-month-old size hat. The hat is 16″ around and 8″ tall.
Gauge:
- 20 stitches and 26 rows = 4 inches in stockinette
Yarn:
- Red Heart Designer Sport Yarn
- Color A – Latte, .6 oz
- Color B – Dutch Blue, .11 oz
- Color C – Pistachio, .11 oz
Content:
- Size 7 (4.5mm) 40″ circular or 5 double pointed needles
- Stitch markers
- Yarn needle
Abbreviations:
inc – addition: knit and purl in the same stitch
k – to become
m – Make a stitch: With the left needle, insert the needle from front to back under the yarn between the previous and next stitch. Knit in the back loop
kw2w – Knitting with two wraps: Insert the right needle to knit, but wrap the yarn twice and pull through.
kw4w – knitting with four wraps: Insert the right needle to knit, but wrap and pull the yarn four times.
dws – drop with slip: slip the stitch purlwise, dropping the extra wraps. There will be one long stitch.
spw – purlwise slip
* – Indicates segments that must be repeated for the round.
sts – stitches
Instructions:
Cast on 4 and set up to work the round. I recommend Magic Cast-On for Toe-Up Socks for the smoothest look.
I continued to use a 40″ circular needle starting with 2 stitches on each needle, but the hat can also be made by transferring each stitch to a double pointed needle. This is a good tutorial for indoor knitting on a long circular needle.
Rnd 1: inc in each (8 sts)
Rnd 2: k
Rnd 3: inc in each (16 sts)
Rnd 4: k
Rnd 5: *k, m, k2, m, k* (24 sts)
Rnd 6: k
Rnd 7: *k, m, k4, m, k* (32 sts)
Rnd 8: k
Rnd 9: *k, m, k6, m, k* (40 sts)
Rnd 10:k
Rnd 11: *k, m, k8, m, k* (48 sts)
Rnd 12: k
Rnd 13: *k, m, k10, m, k* (56 sts)
Rnd 14: k
Rnd 15: *k, m, k12, m, k* (64 sts)
Rnd 16: k
Rnd 17: *k, m, k14, m, k* (72 sts)
Rnd 18: k
Rnd 19: *k, m, k16, m, k* (80 sts)
Rnd 20: k
Rnd 21: *k2, kw2w, k4, kw4w, k2*
Rnd 22: Color b *k2, dws, k2*
Rnd 23: *k2, spw, k2*
Rnd 24: *k7, spw, k2*
Rnd 25: Repeat 24.
Rnd 26: k
Rnd 27: *k2, kw2w, k4, kw4w, k2*
Rnd 28: Color c *k2, dws, k2*
Rnd 29: *k2, spw, k2*
Rnd 30: *k7, spw, k2*
Rnd 31: Repeat 30.
Rnd 32: k
Rnd 33: *k2, kw2w, k4, kw4w, k2*
Rnd 34: Color a *k2, dws, k2*
Rnd 35: *k2, spw, k2*
Rnd 36: *k7, spw, k2*
Rnd 37: Repeat 36.
Rnd 38: k
Knit 6 additional rounds.
k2, p2 to complete 12 rounds of ribbing.
Decline. I recommend using a yarn needle with the knit-to-pearl-to-ribbing cast-off method for the neatest look.
Pistol Stitch – Long French Knots
A hand embroidery stitch called a pistol stitch (or long French knot) really comes in handy when sewing flowers. The reason is obvious – it looks like its namesake, a pistol inside a flower.
The pistil stitch is an easy stitch to master, and it works well on all kinds of flowers, or even on its own, in completely non-floral situations.
I’m using the pastel stitch on the flowers, on the Secret Garden project. Some readers have asked for tips on how to work this stitch, so here’s a simple tutorial to show you how to work the pistol stitch.

See the yellow “pistils” in these stylized flowers? Some – but not all – of these are pistol stitched. Some are just straight stitches. Some are straight stitches with French knots on top. Whether I used a pistol stitch or just a straight stitch was determined by how much I wanted to fill the stem area (where the straight stitches are), and whether or not to add another French knot. Or the pistol stitch will crowd the line too much.
In any case, here’s how the pistol stitch works:
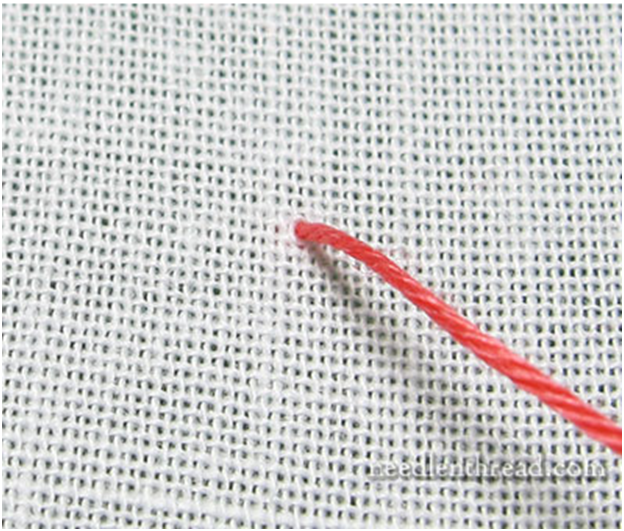
Bring the needle to the front of the fabric at the base of the pistol stitch – that is, at the end of the stitch that is not knotted.
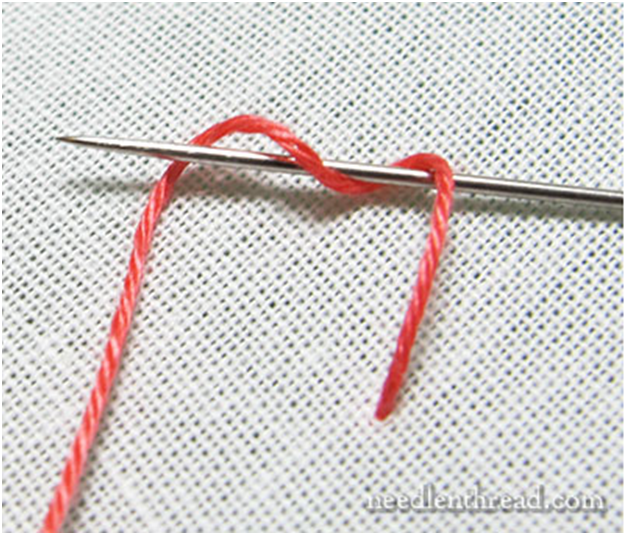
Wrap your yarn around your needle, as you would with a regular French knot.
I’m a double wrap french knot kind of girl myself. Some people use three wraps, some people only use one (I find one wrap too small), and some people ask about using four or more.
I can see using three wraps when you’re trying to get a really heavy knot, but the more wraps you put on the needle for a French knot, the more random the knot will be. I’d say that three is about the limit for a “rolly” knot, while four or more would tend toward anomaly.
Remember, there is only one thread on one side of the knot that holds the knot in place and shape, so the more wraps you move around without an anchor, leaving one side, the more likely the knot will fall off. There will be, it will be splashed. , or other nodal problems are faced.
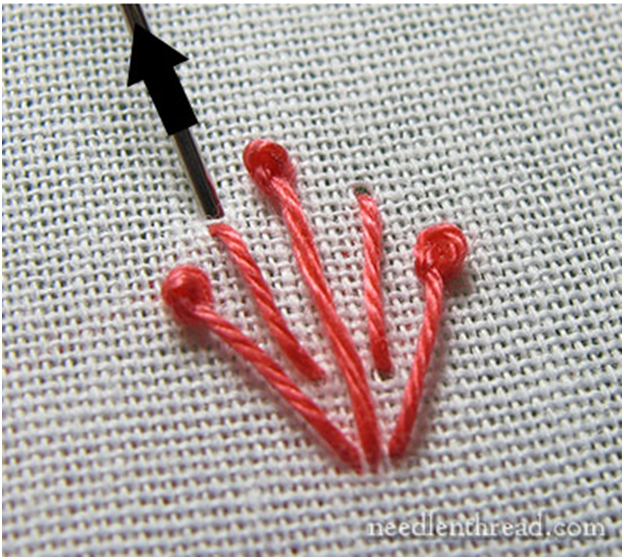
In any case, back to the pistol stitch. Before I could so rudely stop myself, we had wrapped something on the needle…
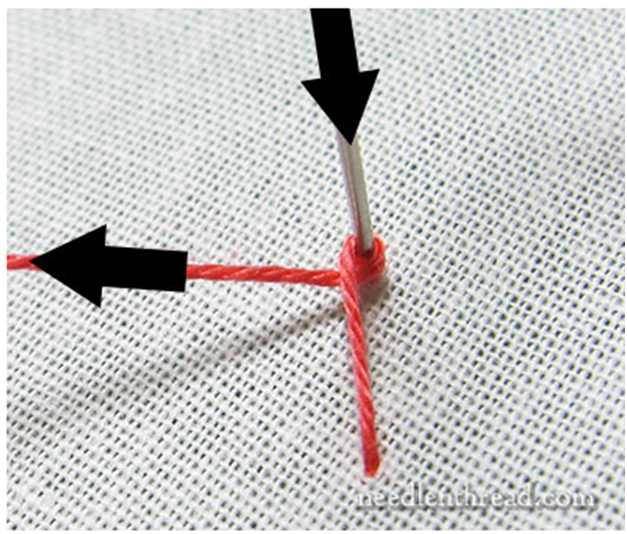
Keeping the tension on the working thread (the one going to the left in the photo above), move the needle down into the fabric where you want the knot on your pistol stitch. This will be at least a short distance from where you started sewing, so that, basically, you end up with a straight stitch tail on the knot.
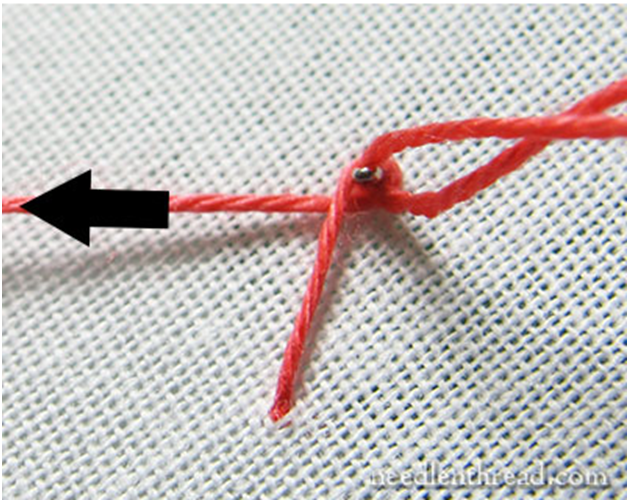
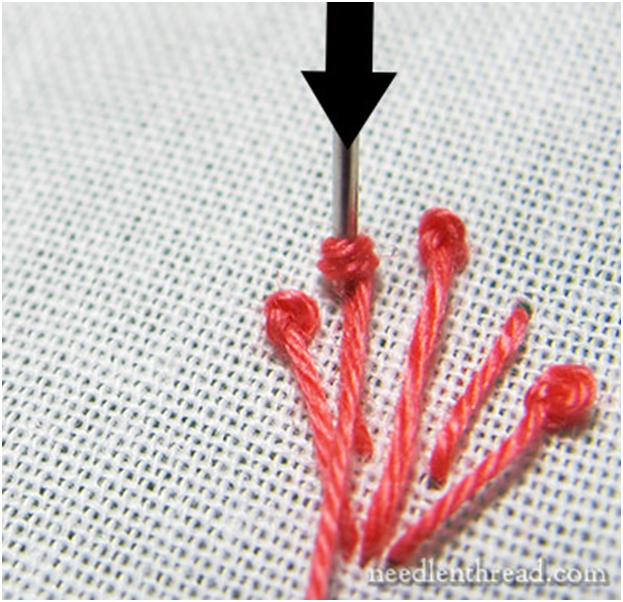
Gently pull the needle down through the wraps, keeping tension on the working thread throughout (where the arrow is pointing to the left in the photo above).
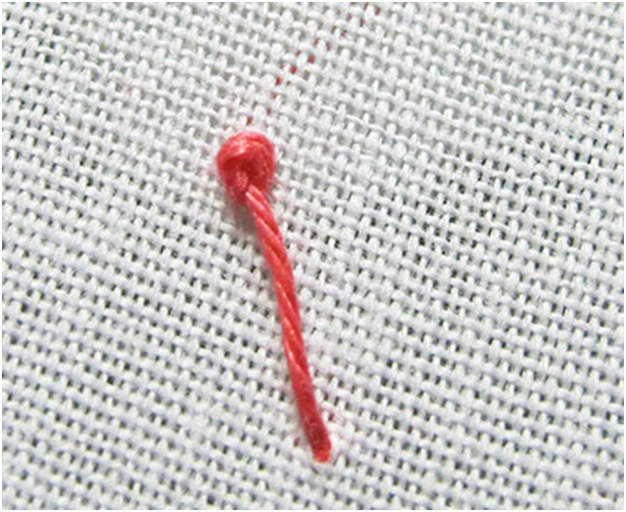
Gently pull the thread through the fabric, letting go of the working thread as your knot is nearing completion.
The knot and tail will not be perfectly straight until you start the next stitch, or finish it by anchoring the thread to the back of the fabric. In the picture above, the stitching is still a little loose, but once I start the next stitch, it will be straight and snug.
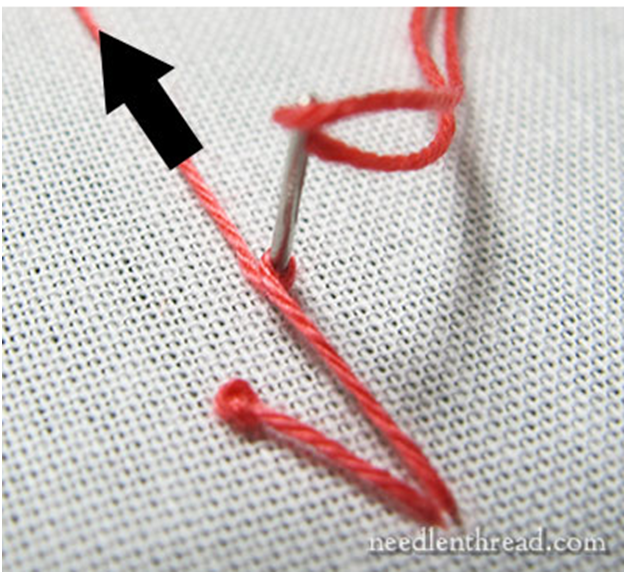
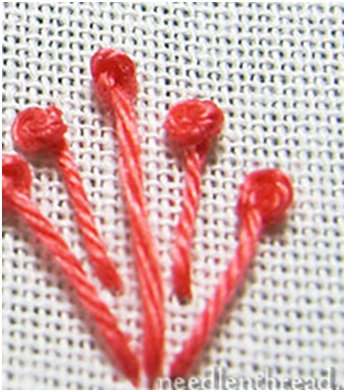
Here, I’m working on another pistol stitch. This time, I keep tension on the working thread, pulling it over the stitch. This will change the orientation and shape of the knot slightly (but not much!).
With the last pistol stitch on the right side, I pulled the working yarn around to the right side, keeping tension on it from the right side of the hoop. You can see that the knot on the right is slightly larger because pulling the working yarn all the way to the right puts another half of the wrap in the knot.
So you can play with where you place your working thread when working the pistol stitch. This can make a slight difference in the shape of the stitch, and you may like one approach better than another.
Here, I’ve inserted two straight stitches between the pistol stitches.
I’m going to tip these guys with a french knot. I only brought my needle up one fabric thread over the straight stitch…
…and after wrapping for the french knot, I’m taking it down into the fabric, straight into the hole where the stitch ended.
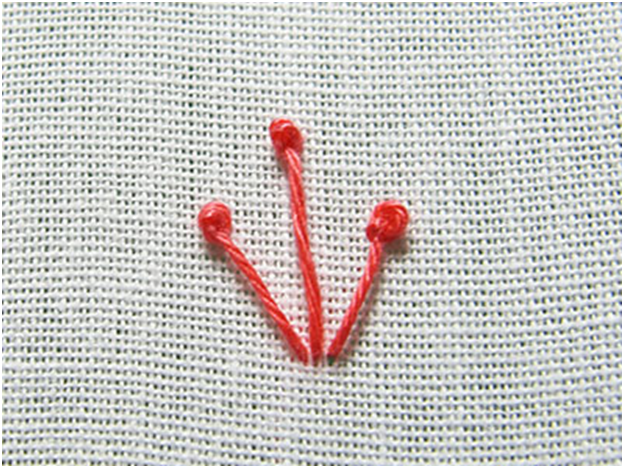
Here, you can see two straight stitches stitched with French knots between the three pistol stitches.
French knots are a little plumper when sewn this way. The knots of the pistol stitch looks a little smaller, but overall, there isn’t much of a difference in appearance. You can easily switch between the two methods of sewing flower pistols, or you can choose whichever method is most convenient for you.
I hope this helps you overcome any difficulties you may be having with the pistol stitch!